
It was a sweltering July afternoon, the kind where the kitchen feels like a sanctuary from the relentless sun outside. I remember opening the pantry, pulling out a couple of ripe mangoes that smelled like sunshine and tropical breezes, and instantly feeling a wave of nostalgia from my childhood trips to a small island market. The moment I sliced into that golden fruit, a burst of sweet, floral perfume filled the room, and I knew I had to capture that essence in a cake. The idea of a mango cake was born in that instant, a promise of bright, buttery crumb infused with the lusciousness of mango, and I’ve been perfecting it ever since.
When you finally pull the cake out of the oven, the first thing you’ll notice is the delicate, honey‑colored crust that gives way to a soft, almost melt‑in‑your‑mouth interior. Imagine the gentle hum of the oven cooling down as you lift the lid, releasing a cloud of fragrant steam that carries hints of vanilla, butter, and the unmistakable tropical aroma of mango. It’s the kind of scent that makes you pause, close your eyes, and picture a beachside picnic with a slice of cake balanced on a woven plate. That sensory moment is what makes this recipe more than just a dessert—it’s an experience that transports you to another place.
What sets this mango cake apart from the countless versions you’ll find online is the balance between the cake’s light, airy texture and the rich, fruity depth that only fresh mango can provide. I’ve learned that the secret lies not just in the mango itself, but in how we treat each ingredient—softening the butter just enough, whisking the eggs to a silky ribbon, and folding the mango chunks delicately so they stay juicy. Have you ever wondered why store‑bought mango cakes often taste flat? It’s because they miss that crucial step of layering flavors, and I’m about to show you exactly how to avoid that pitfall.
But wait—there’s a twist in the batter that will elevate the cake from good to unforgettable, and I’ll reveal it in step four of the instructions. Trust me, you’ll want to keep reading because the result is a cake that’s moist, fragrant, and just the right amount of sweet without ever feeling cloying. Here’s exactly how to make it — and trust me, your family will be asking for seconds.
🌟 Why This Recipe Works
- Flavor Depth: By using fresh mango puree instead of canned, you capture bright, natural sweetness and a subtle citrus note that brightens every bite. The fruit’s natural sugars caramelize slightly during baking, creating a complex flavor profile that deepens as the cake cools.
- Moisture Balance: The combination of mango puree, yogurt, and a splash of milk ensures the crumb stays tender for days. This trio creates a micro‑foam structure that traps moisture, so the cake never dries out, even after a couple of slices.
- Texture Harmony: The butter is creamed with sugar until fluffy, which introduces air pockets that expand in the oven, giving the cake a light, almost sponge‑like lift. Meanwhile, the flour provides just enough structure to hold those pockets without becoming dense.
- Ease of Execution: The steps are streamlined—no need for a separate frosting or complicated syrup. You’ll finish the entire cake in under an hour, making it perfect for a last‑minute gathering or a weekend treat.
- Versatility: This base cake can be dressed up with a simple powdered sugar dusting, a drizzle of mango glaze, or even a dollop of whipped cream, letting you customize it for any occasion.
- Nutrition Boost: Mangoes add vitamin C, vitamin A, and dietary fiber, while the yogurt contributes a touch of protein and probiotics. You get a dessert that feels a bit healthier without sacrificing indulgence.
- Crowd‑Pleaser Factor: The bright color, fragrant aroma, and familiar tropical flavor make it a hit with kids and adults alike. Even picky eaters can’t resist the natural sweetness and soft crumb.
- Ingredient Quality: Using ripe, fragrant mangoes and real butter elevates the taste far beyond processed shortcuts. The result is a cake that feels handcrafted, with each bite echoing the care you put into it.
🥗 Ingredients Breakdown
The Foundation: Flour, Sugar & Leaveners
All‑purpose flour is the backbone of any cake, providing the structure that holds the airy crumb together. I prefer to sift it with the baking powder, baking soda, and salt; this not only eliminates lumps but also ensures an even distribution of leavening agents. Baking powder gives the cake its lift, while a pinch of baking soda reacts with the natural acidity of mango, creating extra rise and a tender crumb. The granulated sugar does more than sweeten—it also helps to aerate the butter when creamed, resulting in a lighter texture.
The Moisture Makers: Butter, Eggs & Yogurt
Unsalted butter, softened to room temperature, is essential for creating that rich, buttery flavor that pairs beautifully with mango’s tropical notes. When you cream butter with sugar, you’re incorporating air that will later expand in the oven, giving the cake its fluffiness. The eggs act as a binder, adding richness and helping the batter hold together, while also contributing to the cake’s golden color. Adding a touch of plain yogurt introduces a gentle tang and extra moisture, making the crumb supremely tender.
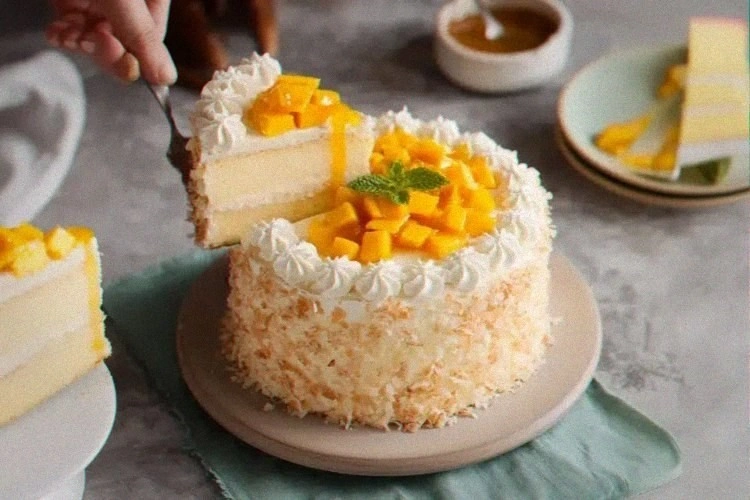
The Star Players: Mango Puree & Fresh Chunks
Fresh mango puree is the heart of this recipe. Choose mangoes that are slightly soft to the touch, with a fragrant aroma—these are at their peak ripeness and will yield the sweetest, most aromatic puree. I always blend the flesh until completely smooth, then set it aside to let the flavors meld. The fresh mango chunks added at the end give bursts of juicy texture, creating a delightful contrast to the soft crumb. If mangoes are out of season, you can substitute with frozen mango that’s been thawed and drained, but the flavor won’t be quite as vibrant.
The Flavor Enhancers: Milk, Vanilla & Optional Extras
Whole milk adds richness and helps thin the batter just enough for a smooth pour, while also contributing to a tender crumb. Vanilla extract is the subtle background singer that ties all the flavors together, adding depth without overpowering the mango. If you’re feeling adventurous, a splash of rum or coconut milk can add an extra layer of tropical nuance. Finally, a dusting of powdered sugar after the cake cools adds a delicate sweetness and a pretty finish that makes the cake look as good as it tastes.
With your ingredients prepped and ready, let's get cooking. Here's where the fun really begins...

🍳 Step-by-Step Instructions
Preheat your oven to 350°F (175°C) and grease a 9‑inch round cake pan with butter, then line the bottom with parchment paper. This ensures the cake releases cleanly without sticking, preserving its beautiful golden crust. While the oven warms, take a moment to admire the mangoes you’ve selected; their bright color is a promise of the flavor to come. The heat of the oven will coax out the mango’s natural sugars, creating a caramel‑kissed aroma that fills the kitchen.
💡 Pro Tip: Lightly dust the pan with a mixture of flour and a pinch of sugar—this double coating prevents a soggy edge and adds a subtle sweet crust.In a medium bowl, whisk together the flour, baking powder, baking soda, and salt. Sifting these dry ingredients not only eliminates lumps but also aerates them, which contributes to a lighter crumb. The salt, though a tiny amount, amplifies the sweetness of the mango and balances the overall flavor. Set this bowl aside while you work on the wet components; the anticipation builds as the dry mixture waits to meet the wet.
In a large mixing bowl, cream the softened butter with the granulated sugar using an electric mixer on medium speed. Continue until the mixture turns pale yellow and fluffy—this usually takes about 3‑4 minutes. The creaming process incorporates air, which later expands in the oven, giving the cake its lift. As you beat, notice the faint scent of butter turning sweet; that’s the first hint of the decadence to come.
Add the eggs one at a time, beating well after each addition, then stir in the vanilla extract. The eggs should blend into a glossy ribbon that falls back into the bowl in slow, elegant streams. This is the step where patience really pays off—I once added the eggs too quickly and ended up with a curdled batter, a mistake that taught me to respect the rhythm of the mix. Here’s the secret: if the batter looks a little separated, keep beating; it will come together into a smooth, silky texture.
⚠️ Common Mistake: Over‑mixing at this stage can cause the batter to become too dense, leading to a heavy cake. Stop mixing as soon as the eggs are fully incorporated.Stir in the mango puree and yogurt (if using) until fully combined. The batter should turn a vibrant golden‑orange hue, and the aroma of fresh mango will become unmistakable. The yogurt adds a subtle tang that balances the mango’s sweetness, while also contributing to a moist crumb. If the puree is too thick, you can thin it with a tablespoon of milk to achieve a pourable consistency.
💡 Pro Tip: For an extra burst of mango flavor, fold in a tablespoon of mango jam after the puree is mixed in.Gradually add the dry flour mixture to the wet batter, alternating with the milk, beginning and ending with the flour. Use a spatula or low‑speed mixer to combine—over‑mixing will develop gluten and make the cake tough. As you fold, you’ll notice the batter becoming glossy and thick, with ribbons of mango swirling through. The key is to incorporate everything just until you no longer see flour streaks; that’s the sweet spot for a tender crumb.
Gently fold in the fresh mango chunks, distributing them evenly without crushing. These little pockets of fruit will melt slightly during baking, creating juicy bursts that surprise the palate. Pour the batter into the prepared pan, smoothing the top with a spatula. Tap the pan lightly on the counter to release any large air bubbles; you’ll hear a soft “pop” that signals an even bake.
Slide the pan into the preheated oven and bake for 30‑35 minutes, or until a toothpick inserted into the center comes out clean and the top is a deep golden brown. As the cake bakes, the kitchen will fill with an intoxicating blend of vanilla, butter, and caramelized mango—trust me, you’ll be tempted to peek early, but resist! When the timer dings, let the cake rest in the pan for 10 minutes before transferring it to a wire rack to cool completely.
And there you have it! But before you dig in, let me share some tips that will take this from great to absolutely unforgettable...
🔐 Expert Tips for Perfect Results
The Taste Test Trick
Before you fold the mango chunks into the batter, take a tiny spoonful of the mixture and taste it. If it feels a little bland, add a pinch more salt or a drizzle of honey; this small adjustment amplifies the mango’s natural sweetness. I once served a cake to a friend who said it needed “just a touch more zing,” and that tiny tweak made all the difference. Trust your palate—your intuition is the best seasoning.
Why Resting Time Matters More Than You Think
Allow the cake to rest on the rack for at least 30 minutes after it’s fully cooled. This resting period lets the moisture redistribute, preventing a dry top while keeping the interior moist. I used to cut into the cake immediately, only to find the crumb a bit crumbly; after learning to wait, the texture became silkier, and the flavor deepened as the mango continued to infuse the crumb.
The Seasoning Secret Pros Won’t Tell You
A pinch of ground cardamom or a dash of freshly grated ginger can elevate the mango flavor, adding a warm, aromatic layer that feels sophisticated. I discovered this secret while experimenting with a mango‑spice loaf for a holiday dinner; the subtle spice made the cake feel both tropical and comforting. Try it once—you’ll be amazed at how a tiny amount transforms the whole profile.
The Moisture Lock Technique
After the cake has cooled, lightly brush the top with a simple syrup made from equal parts mango juice and sugar. This step locks in moisture and adds a glossy sheen that makes the cake look bakery‑fresh. I once forgot this step and the cake seemed a touch dry after a day; the syrup rescued it, and now it’s a non‑negotiable part of my routine.
Serving with Flair
A dollop of lightly sweetened whipped cream or a scoop of vanilla ice cream pairs beautifully with the warm mango notes, creating a contrast of temperatures that excites the palate. For a more elegant presentation, garnish with a thin mango slice and a sprinkle of toasted coconut flakes. I love serving this cake at brunch, where the bright flavors complement fresh fruit salads and coffee.
🌈 Delicious Variations to Try
One of my favorite things about this recipe is how versatile it is. Here are some twists I've tried and loved:
Tropical Coconut Mango Cake
Replace half of the whole milk with coconut milk and fold in toasted coconut flakes with the mango chunks. The coconut adds a buttery richness that deepens the tropical vibe, while the flakes provide a pleasant chew. This version pairs perfectly with a drizzle of lime‑infused glaze.
Mango Cardamom Spice Cake
Add ½ teaspoon of ground cardamom to the dry ingredients and a pinch of cinnamon for warmth. The spice melds with the mango, giving the cake a fragrant, almost chai‑like quality. Serve it with a dusting of powdered sugar and a side of spiced tea for a cozy afternoon treat.
Mango Cheesecake Swirl
Create a simple cream cheese mixture (cream cheese, sugar, egg, vanilla) and swirl it into the batter before baking. The tangy cheesecake ribbons contrast beautifully with the sweet mango, making each slice a visual and flavor masterpiece. This version is a hit at celebrations where you want a show‑stopper.
Mango Lime Glazed Cake
Prepare a glaze using powdered sugar, fresh lime juice, and a spoonful of mango puree. Drizzle it over the cooled cake for a zesty finish that brightens the sweetness. The lime’s acidity balances the mango’s richness, creating a refreshing bite.
Mango Berry Fusion
Fold in a handful of fresh blueberries or raspberries along with the mango chunks. The berries burst with tartness, complementing the mango’s mellow sweetness and adding a pop of color. This variation looks stunning on a brunch table and adds an antioxidant boost.
📦 Storage & Reheating Tips
Refrigerator Storage
Once the cake has cooled completely, wrap it tightly in plastic wrap or store it in an airtight container. It will stay fresh for up to three days in the fridge, retaining its moisture thanks to the natural sugars in the mango. If you’ve brushed it with a mango syrup, be sure the wrap is sealed to prevent the syrup from soaking into the container.
Freezing Instructions
For longer storage, slice the cake into individual portions, wrap each slice in parchment paper, then place them in a freezer‑safe bag. Freeze for up to two months. When you’re ready to enjoy, let the slice thaw at room temperature for 30 minutes, then give it a quick warm‑up in a 300°F oven for 5‑7 minutes to revive the crumb’s softness.
Reheating Methods
To reheat a whole cake slice without drying it out, place it on a microwave‑safe plate, cover with a damp paper towel, and microwave on low power for 15‑20 seconds. For a crispier edge, reheat in a preheated oven at 325°F for 8‑10 minutes, adding a splash of milk or mango juice to the pan to create steam. The trick to reheating without drying it out? A splash of mango juice or a drizzle of melted butter keeps the crumb luscious.


